To get warmed up for the workshop, here is a quick overview of making a Spikey Ball. Let's start by looking at a Soccer Ball and a Spikey Ball and compare and contrast.
A Soccer Ball, the kind that we kick around on a field, is constructed from 20 hexagon panels and 12 pentagon panels. We are making a soft version that will act as a windsock. so we need an opening in the Ball. We will leave out one pentagon to make the opening. To make a Soccer Ball as pictured above, draw a hexagon with 5" sides. Add 1/8" all the way around and that is the template used to make the Soccer Ball & Spikey Ball pictured above. Cut 20 hexagonal panels. Then draw a pentagon with 5" sides, and add 1/8" all the way around.Cut 11 of them. Sew the parts together by overlapping them 1/4" and sewing with a zig-zag stitch.
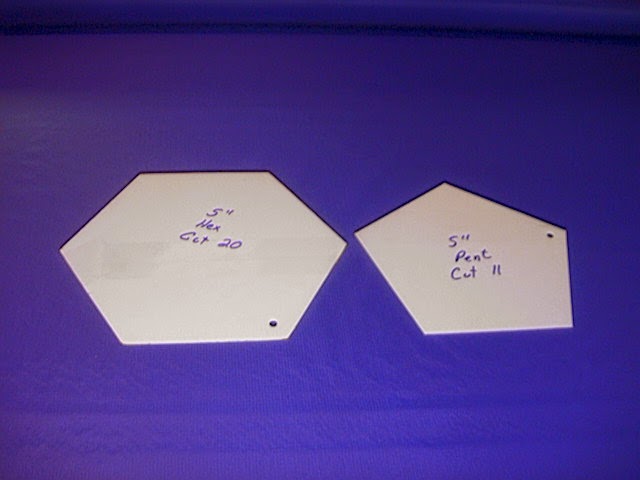 |
| Soccer Ball Templates |
We want to make a Spikey Ball, so we want Spikes instead of pentagons. To make a raised panel, to turn a flat 2-dimensional panel in to a 3-dimensional panel, we need to elongate the imaginary lines from the corners of the panel to the center of the panel.
If we drew a line from each corner of a pentagon to the center of the pentagon, we would have 5 isosceles triangles.
If we double the length of the two congruent (same length) sides of one of the triangles, it looks like this:
So, we could make each of the 11 pentagon/spike panels using 5 isosceles triangles like the one above. That means 55 parts instead of 11, and sewing 55 pieces together before we even begin to assemble the Spikey Ball. Call me lazy, but I wanted an easier way. I drew a template that included all 5 triangles and a seam allowance. There is a little more fabric waste, but saving the time cutting & sewing more than made up for it.
 |
| Normal Soccer Ball pentagon on left, 5-triangle Spike Template on the right. |
Some notes on making the templates:
Despite years of teaching 6-sided Facet Kites and telling people that hexagons consist of 6 equilateral triangles, I was surprised to realize that another way to look at it was that each side of a hexagon is the same as the radius of the circle it would inscribe. So, to make a perfect hexagon, draw a circle with a radius of the side of the hexagon.
 |
| Circle with radius of 5" |
Now use the same compass at the same setting and place the point on the circle and draw both places the pencil crosses the circle.
 |
| Compass Point placed at 3:00, and circle marked at 1:00 and 5:00. |
Now place the compass point on one of those marks and do it again.
 |
| Place the compass point on a mark, and draw two marks. |
By drawing two marks each time, eventually there will be two marks at each position. This confirms the position of each mark, and if any are off, the two marks can be 'averaged' to draw the hexagon. When all 6 positions are marked, draw the hexagon.
We will be using 1/4" seams, which means we need to add 1/8" to each panel. Add 1/8" around the outside of the hexagon.
To make the Spike Template, remember that the concept is a Spike with a 5-sided base, and a height that is twice the base. So our imaginary triangles have a base of 5" and a height of 10". If we use the Pythagorean Theorem (A
2 + B
2 = C
2) using 2.5 and 10 for sides,we learn that the Hypotenuse is 10.3".
Draw a 1/4" Seam Allowance along an edge of the template material. Use a Beam Compass set to 10.3", put the point on that line, and draw an arc with a radius of 10.3".
 |
| 1/4" Seam Allowance at bottom, Compass Point on that line, arc with 10.3" radius. |
Now use the first compass, still set to 5", to draw arcs along the first arc, starting at the Seam Allowance.
We need 5 of them.
Connect the dots, er, the Arcs. Draw a line from the last 5" chord (
an chord is a line inside an arc) to the center of the first arc, where the point of the first compass was. Add a 1/4" Seam Allowance to that 10.3" line:
Finally, add a 1/8" Seam Allowance to the five 5" lines:
**********************************************************************************
Assembly: As we go through this process, keep repeating to yourself: Two Spikes never touch! There is ALWAYS
ONE (
AND ONLY ONE!) hexagon between every Spike! On each Hexagon, the panels alternate.One edge gets a Pentagon, the next edge meets a Hexagon. Each Hexagon gets 3 Hexagon panels and 3 Pentagon (or Spike) panels sewn to it.
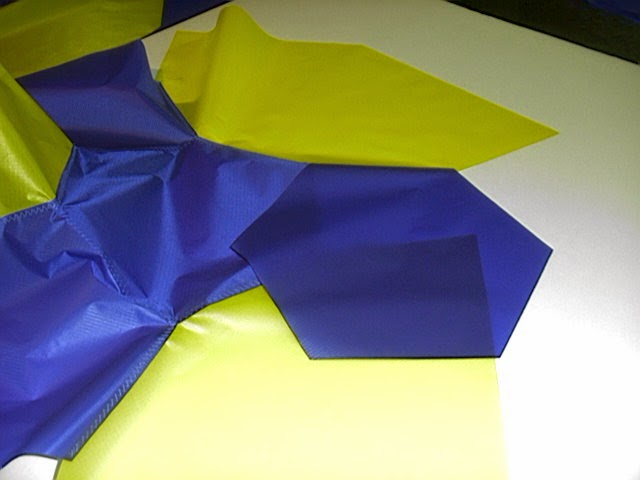
We start with the Spike at the rear of the ball, the one that is directly opposite the opening. We will take a Spike and sew 5 hexagons to it. HINT: The best way to keep the parts aligned is to fold each
edge in half and crease to have a centerline. That way edge of the hexagon will be centered on each edge of the Spike 'fan' Panel.
Fair warning, I am anal. I always want a system. It helps me keep track of things. I started at one edge, and worked my way around the edge of the fan. That way each succeeding hexagon overlapped the previous hexagon in the same way.
 |
| The hexagons are not different colors, that is just the grain of the fabric. But it shows the way the panels overlap. |
The next step is is to overlap the adjoining edges of the hexagons and
sew them together using a simple lap seam and a zig-zag stitch. All 5 hexagons can be sewn to the Spike Panel in one step.
 |
| 5 hexagons sewn to one Spike. |
 |
| Sides of hexagons sewn together. |
|
The next step is to sew the Spike closed. Fold it over, 'good' sides together, align the edges and the ends.
 |
| Spike Assembly above is folded 'good' sides together, ready to be sewn along the yellow only. Make sure the edges of the Hexagons (bottom right in pic) are aligned and Straight Stitch the yellow, 1/4" in from the edge. Do not sew any of the blue, not yet. |
If the 'point' of the Spike isn't right when the hexagons are aligned, don't worry. We want it to look good, so we want the hexagons to line up. Anything 'off' in the point of the Spike will be hidden inside the Ball. I like to hot tack the edge of the Spike closed. Run it through the sewing machine using a straight stitch. Do not sew the hexagons!
Avoid the temptation to sew the hexagon closed as well. You will want that hexagon seam to be the same as the rest of the hexagons seams when it is time to add the next panel(s). Turn the Spike assembly right-side-out, and lap-seam the adjoining edges of the hexagons closed with a zig-zag stitch as before.
 |
| Ready to be sewn closed. Use a zig-zag to lap-seam like the others. |
 |
| Sewn closed and ready for next Spike panel (right). |
 |
| Notice that first edge is left free. |
Leave one edge of the Spike Panel free, and align the next 2 edges of the Spike Panel to a pair of hexagons on the completed Spike Assembly. Again, pinching each edge of each panel in its center aids in alignment. Sew them down, lap seam, zig-zag.
Leave one face of one hexagon open, and do it all over again. And do it again... until there are 5 attached.
Now what?
There should be 5 openings around the edge of the Project that look like the one above. Each one of these openings gets a hexagon.
 |
| Align the first edge of the hexagon, and then sew 3 adjacent edges in place. |
 |
| Above, each hexagon has 3 edges sewn in place. Yes, there is 1 (one) lonely edge of the Spike panel that has nothing sewn to it. |
Are we having fun yet? Is this the fun part? I don't want to miss the fun part. Let's see... Each of our Spike Panels around the outside of the project has 4 hexagons sewn to it, and 1 edge free.
 |
| The free edge of the Spike Panel on the right gets a hexagon. |
 |
| Sew 2 edges of the hexagon. Sew the edge joining the yellow Spike Panel, and the edge of the other hexagon. |
|
 |
| Do it again until there are 5 new hexagons sewn in place around the edge of the project. Notice that now every Spike Panel has 5 hexagons sewn to it. It is time to sew the Spikes closed. |
 |
| As before, we will fold the Spike(s), good sides together, align the hexagons at the bottom of the seam, and sew the Spike(s) closed, using a Straight Stitch, 1/4" in from the edge, without sewing the hexes at the end. |
When all 5 Spikes have been sewn, turn the Spikes right-side-to and sew the hexagons closed.
 |
| Hey! It's beginning to look like a Spike Ball! |
The picture above is trying to show that there are 3 edges at each opening around the edge of the Ball. We can align the middle 3 edges of the Spike Panel to these edges for the next step.
 |
| Align the middle 3 edges of the Spike Panel to the openings in the Ball. |
Align each Spike Panel to the Ball and sew 3 edges. Do this for all 5 Spike Panels.
 |
| 5 Spike Panels sewn to Ball. There are now 5 openings around the Ball, each with 3 open edges. |
In each opening, align and sew 3 edges of a hexagon.
 |
| Hey! We are out of parts! This is the fun part! What pun? |
So the good news is that we are out of parts. But we still have some sewing to do. Each Spike Panel around the outside has 5 hexagons sewn to it, so it is time to sew the Spikes closed. By now you know how to do that, right?
 |
| All the Spikes are sewn closed. Now join the open edges of the hexagons. |
|
There are only 5 seams left! At the end of each Spike seam, sew together the 2 hexagons. Just one edge gets sewn. When all are the hexagons are sewn, there will be a pentagon shaped hole.
The hole has a raw edge and the Spikey Ball needs tabs for a bridle.
Oops, I said we were out of parts.
I lied!
I cut 2-inch wide strips of ripstop and folded them in quarters to make grosgrain edge binding.
 |
| Ripstop 2" wide, folded in half, and then folded to the fold, to make 1/2" grosgrain edge binding. |
 |
| Edge binding sewn in place. The overlaps in the corners will be covered by the Tabs. |
Above is a workshop model using half-hexagon scraps, left over from the initial cut of hexagons. This will help workshop participants picture how to finish the raw edges of the mouth of the Spikey Ball.
Too much information: Above are the same 5 half-hexagons, before sewing. Notice that they are perfectly flat. If there were 6 of them, they would stay flat. Sewing together the 2 bottom edges is what makes a ball.


No comments:
Post a Comment